Sunday, January 13, 2013

Honey Blonde Ale Gone Horribly Wronght.


Sunday 3/11/2012 - Seattle, WA - Brew Day Log Entry
Honey IPA

Batch Size 12.5 Gals

Fermentables:
42 Lbs Cambrinus Base (Grain)
3.5 Lbs Cambrinus Honey (Grain)

Hops/others:
8 oz Simcoe 12.2AA @60Min (Pellet)
4Tbs Irish Moss @30Min (Pellet)

Yeast:
2 packages - Wyeast American Ale 1056 (Liquid)

Mash:
Mash In @ 160F @ 9:30AM-12:30PM

Boil:
Start heating brew for boil @ 1:30PM
Begin Boil @ 2:30PM addition - 8oz Sincoe @ 2:30PM
add 4Tbs Irish Moss @ 2:55PM
Dry Hop addition - 4 oz Simcoe on 3/17/2012 to fermenter

Ferment:
Starting Gravity 1.071
Terminal Gravity 1.010
Alcohol Content 8.1%
Starting Volume 12.5 Gals


3/21/2012

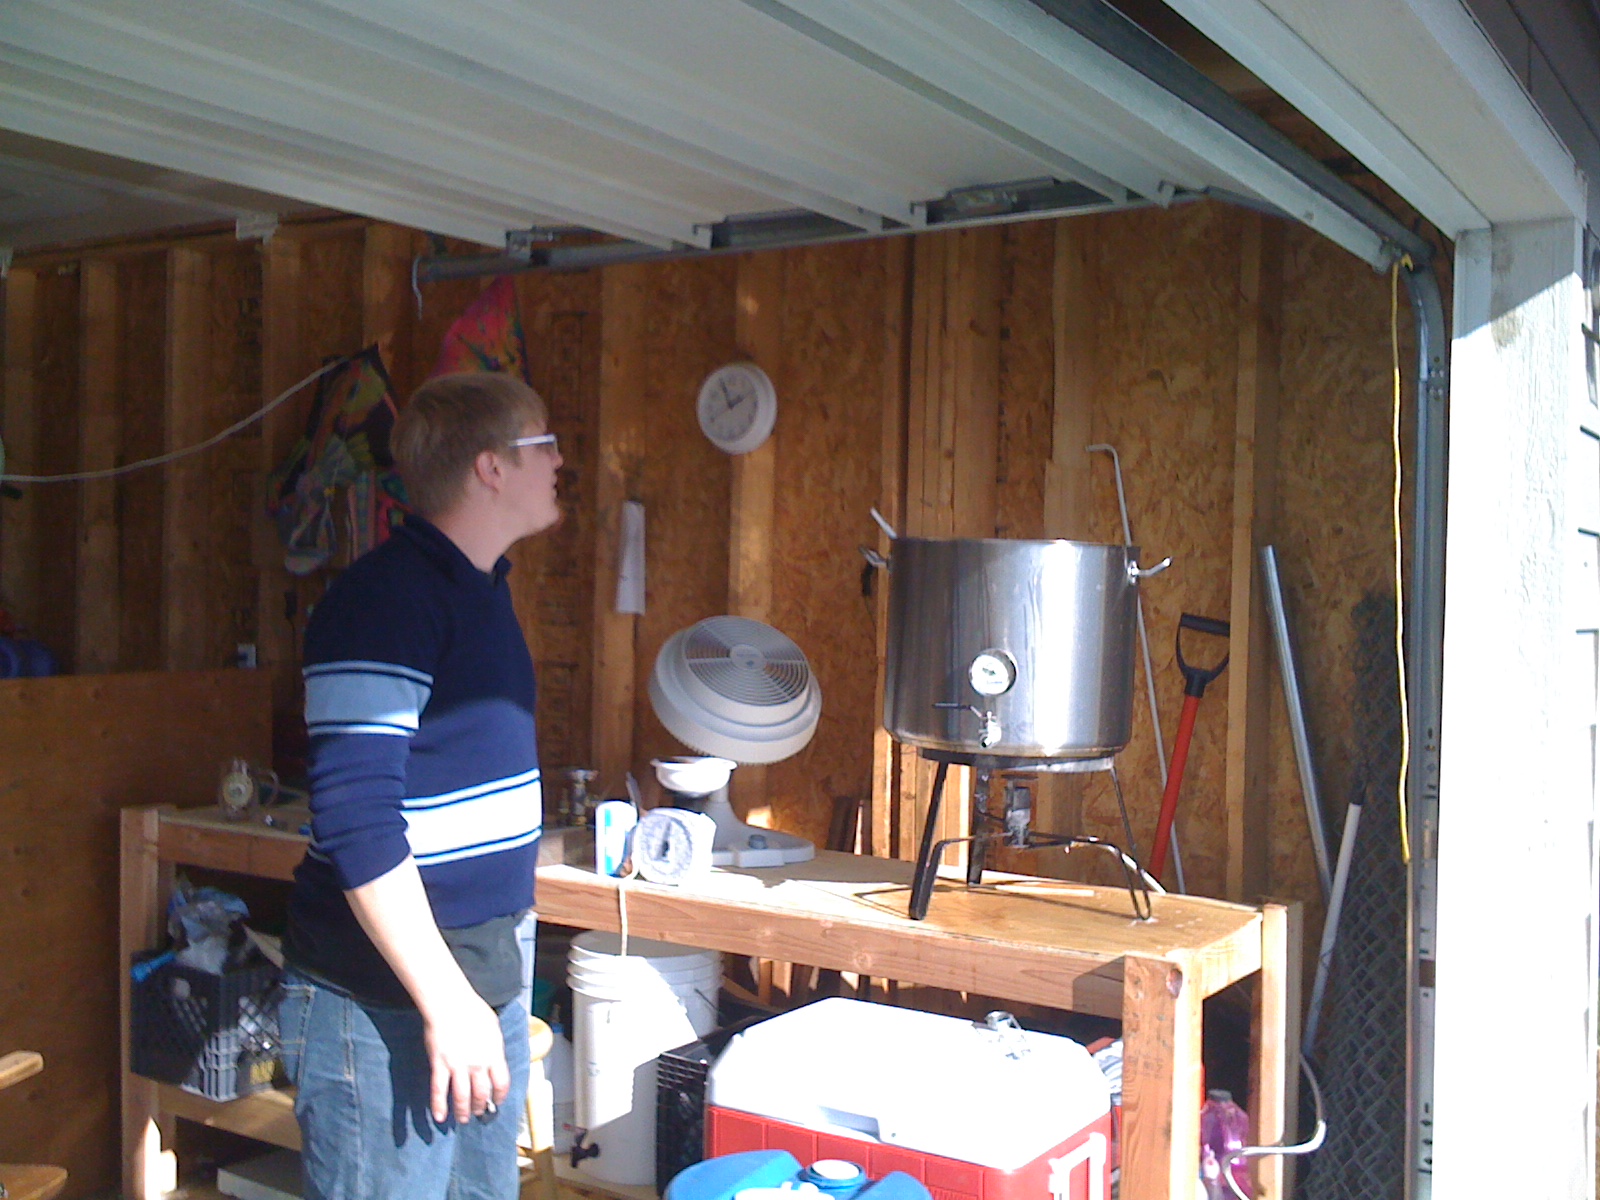
   So here it is, The first brew of the season. I just got custody of my brew kettle, as me and my buddy Kevin went in on it together. We should have anticipated the distance between us as an obstical (considering that we live 106 miles apart) However with the brew kettle clean, gleaming, and happy in my garage. It's off to the races.
   I just brewed my first successful/unsuccessful brew of the year. It really depends on what you consider a success. I was trying to brew a Honey Blonde ale. Light, golden, full flavored, lightly hopped, 5% ABV... and so on and so forth, but fate is a cruel temptress. I added 6lbs of extra base to the mash (by mistake). How in the world! Right? I was adding in increments of 6lbs and miscounted. It's a large mistake it is, and it threw off my starting gravity by a lot.
   I was trying for a nice 1.055 and I got a... Are you ready for this? Drum role... 1.071 The dark clouds let them gather will I let them ruin my parade.
   In the words of Kevin, "I dry hopped that shit." Not only did I brew with too much grain I sparged with too less water. My final volume was just 12.5 gals, a far cry from the 14.5 I was hoping for. I just can't bring my self to dilute the wort with distilled water. Not yet at least.
   So in the hopes of brewing a great, light, full bodied, sipping, yard work day ale. Now i think you can honestly just call this a go down way too easy, 8.5% Honey IPA. Not all is lost, there's definately a demand for Krunk Juice. Especially at my place, and the first few swigs off the fermenter have shown a consistently tasty ale. It has a lot of yeast bite still considering it's activly fermenting, however the other tones are consistent with an India Pale Ale in need of some muchly needed Dry Hopping. I just added 4 oz simcoe to the fermenter, in an attempt to make this ale a masterpiece.

   I would recommend experimenting with the Cambrinus Honey to anyone. You can see that this recipe is very similar to a lot of IPA recipes however it's a little lower on bittering hops, has the honey grains, and a little higher on dry hopping that gives the ale a much more pronounced floral flavor that compliments the honey grains in the grain bill. This ale also has a superb blend of sweet and bittering, of course being a honey ale you want a slight malty characteristic, but it's not over powering in the least. The next time I brew I will try to recreate this ale as closely as I can, however the water in the Seattle, WA is very soft and delicious. Now that I live in Spokane, WA I'm not sure what I'm going to do about the water supply. I just don't like the tap water much here. I may have to request a water analysis from the utility. This is free by the way and public knowledge if you ever have concerns about your water supply.
 

Cheers and Happy Brewing, and I hope you have time to try this recipe. It's a good one.


Tuesday, March 1, 2011

Vigilante IPA

March 1st 2011

Vigilante IPA Brewed on 2/19/2011
Brewed with left over light malts with lots of hops to make an IPA. Hoping that it will have a light yellow/green color with a mix of hoppy/bitter flavor to counter act the medium sweetness that it will have. The Starting Gravity came it at 1.061 which should yield a high ABV of at least 5.5% to 6.0%

Recipe:

Fermentables:
29lbs Pale (Cambrinus)
3lbs Munich

Hops:
4 oz Somcoe 12.2AA @ 60min
2 oz Willamette 4.2AA @ 30min
2 oz Nugget 13AA @ 30min
2 oz German Perle 8.1AA @30min

2 oz Willamette 4.2AA @ 0min
2 oz Nugget 13AA @ 0min
2 oz German Perle 8.1AA @0min

Other:
3Tbs Irish Moss
Ale Yeast

This beer has been fermenting for about a week and a half at 68 degrees F. It should be done in a week or so. 

Monday, February 14, 2011

Home Brew Kegger in Ellensburg, WA.

Feb. 14th 2011

Some day I'd like to open a brewery. It's that dream that I have, that I'll do, when I win the lotto. Most other people will say travel, or buy a house. I'm with that third group, start a business. So in preparation for such dreams I'd like to stay proactive. This last weekend I threw a very successful Home Brew Kegger. I found out that people generally are proud of beer brewed near to them. And they are very honest about the beer when you're at a place as informal as a Kegger. Generally everyone liked the T-Rex Amber Ale and Backwards Brewery's IPA. The Nut Brown Ale came in third, and was disliked next to the others. All in All I believe this was a great start to public awareness of Nilrod Home Brewery and Backwards Brewery.

Saturday, February 5, 2011

DIY Temperature Controllers and Fermenter Heaters

Feb. 5th 2011

    I got it! To save money I purchased the STC-1000 aquarium digital mini temperature controller from a place in Hong Kong. $25 paid for the controller including temperature probe and shipping. That's too good to pass up considering I would have to pay about $80 for the equivalent one here in the states, and you'd have to buy the temperature probe separately. I also didn't want to pay a lot for something that I may or may not have gotten to work. It took about a month to receive the package due to extremely bad weather, however that is exactly why I needed it. I'm using it in conjunction with a Ferm-Wrap heat pad so that I can heat my fermenter with out leaving the house heat on. You can save money on the Ferm-Wrap too if you buy it online. The Ferm Wrap Heating pads are the same pads used to keep retile cages warm.


   In this photo you can see the heating pad covering the outside of the fermenter.


   You can buy different sizes of FlexWatt Tape so you can customize it to your fermenters. I needed one with less width and more length to fit my conical fermenter.
   It's also distributes heat better so that you can use it on glass carboys. It's a better alternative to the heat belt which could break glass carboys. The FermWrap can also be insulated on one side, so you can still wrap a towel around your fermenter after you get it all set up.
   If you want to use your temperature controller as a refrigerator controller. It works for that as well. It has dual functionality so you can use it to control a heater and a refrigerator at the same time. When the temperature drops below set value it turns on power to the heater, and when the temperature gets above set value it turns on power to the refrigerator.


   So I got the STC-1000 and after a little trial and error I was able to get it wired up. I used this diagram DIAGRAM LINK and it worked for me. As usual when I first got it, I tried to wire it up with out using the diagram and just wasted about 30min. After that, I looked at the diagrams and wired it up correctly. It uses a direct negative to the heater with a controlled on/off switch for the positive power. It's very basic. The digital display is in Celsius, which is weird considering I like the Fahrenheit scale better for brewing. Fahrenheit is a large enough range that you don't have to mess with decimals. Also I have all of the land mark values memorized in Fahrenheit. I really don't know how much more memorization my brain can handle, but I suppose a few Celsius values wont overload it. I recommend this temp controller for anyone new who hasn't used these devices before. They're a good unit to learn on.

However I have not used the other types of temperature controllers, so a direct comparison from me is not available.


I'm in between ferments right now so I don't have the FermWrap on however, here are some pics. I will show a pick of it with the FermWrap as soon as I can. In the mean time check it out.


I just wired up a second unit. The cost for a unit is $25 for the digital temperature controller with temp probe

Controller with Probe              $25
Extention cord                         $2
Plug for Heat Pad                    $9
Heat Pad Tape                         $9
Total                                        $45

That's really not bad. Less than the price of a glass carboy and almost as essential. I can honestly say that temperature control over the ferment is very important to obtaining a good tasting beer.

I normally set the temperature to whatever the optimal value is for the yeast I'm using then cover the whole thing in a sleeping bag. In the summer I keep the fermenter in the coolest place I can find while it's fermenting, however during the winter I just keep the Ferm Wrap with temp control hooked up and keep it really well bundled with old sleeping bags. It works real well. I get consistent temperature which keeps the yeast happy. When the yeast is happy, the beer is happy.
                   

Honey Blonde Ale

Feb. 5th 2011

   On monday, I'm going to make a Honey Blonde Ale. This style is characterized by lightly hopped, slight to heavy honey flavor, yellow or gold in color with medium to heavy carbonation. At least that's what I'm going for. I'm using Honey malts for the honey flavor that it gives and also some actual honey because it will provide me with some "street cred" when someone asks me, "What's in it?"
   I haven't confirmed all of the quantities, but I think I've nailed down these ingredients:

ACTUAL:
Name: Beeze Neeze Honey Blonde Ale
Size: 15 Gal Batch
Fermentables:
27 Lbs Pale (Cambrinus)
3 Lbs Honey Malts
1 Lbs Cara-Pils
1 Lbs Bulk Honey

Hops:
4 oz Sincoe Pellets 12.2 AA @ 60min

Other:
3Tbsp Irish Moss


   That's it. It seems like a very simple recipe. I'll Mash-in at 160F (Mash Temp around 153F) That should produce more unfermentable sugars that will sweeten it up a little, at least more so that Mashing-in at 155F (Mash Temp around 148F).
   Since I've never made this style before it will be nice to keep it simple. This is also the first Ale that I will not use Crystal Malts in. I've been interested in trying a recipe that doesn't use them, because I really don't know what Crystal Malt flavor is in the flavoring of the ales.

Feb. 7th 2011

I did it, and it came out perfectly. The color is sunset gold, and it tastes like honey. The best part is that the Starting Gravity is 1.050. It was simply a perfect Mash and Boil. On top of that I have it fermenting in my 15gal conical fermenter and I have the temperature controlled at 68F. keeping the temperature constant was sort of hard before I had the FermWrap and Digital Temperature Controller. Finally to top if all off. I can keg this beer, I've always prefered fresh kegged beer as opposed to bottled. So i'll check in, in about 3 weeks to let you know how it turned out.

March 1st 2011

The Beeze Neeze Honey Blonde Ale is now on tap. It's has been a very good tasting beer to have during the last 2 weeks, and this weekend it is going to a Kegger. The Blonde Ale really is a style that is easy to brew and very tasty. Adding honey malts to the recipe to make it a honey blonde really added some great flavor. When making a honey blonde I would suggest staying with the 1lb honey malts/5gal. This is a good mellow area for the honey flavor. I added real honey to the recipe, but I think I may remove that next time. Honey adds wax and oils to the beer, which darken the beer and leave a precipitate in the bottom of the glass. I think there is also a tart taste, however I'll have to verify that the next time I brew it.     Although by class the blonde ales are suppose to have a minimal amount of hops I think I would double up the hops added. The last thing I would tweek would be the mash temp. I would lower it 5 degrees F. However those are small changes to this amazing beer. The beer comes in a 5.25% ABV.

Thursday, December 30, 2010

Charlie Papazian

Dec 30th 2010

  I was lucky enough to get "Microbrewed Adventures" gifted to me this holiday season. Within minutes of receiving it I had leaped head first into the stories enclosed in it. Charlie has been described as the father of American microbrew. His books are great resources for the green homebrewer. In his time there wasn't Wyeast, and there wasn't local homebrew supply stores. He literally wrote the book on homebrew. Literally, if you want to read it, you can it's "The Complete Joy of Homebrewing." I picked it up because it was a used copy on sale for $2 at Powell's. What a great buy it was, and I'm glad that it was Charlie that ushered in brewing for me.
   In the Powell's coffee shop in Portland, OR I thumbed through my used copy of "The Complete Joy of Homebrewing." The author hinted that brewing was at times very frustrating. Then he would state, "Relax, don't worry, have a homebrew." I feel like he may have gotten frustrated a lot in those early days because he used the phrase a lot. I chose the nicest looking copy out of the 5 or 6 used copies sitting on the shelf. It was still fairly worn. There were no hardcover copies available. The cover was thin and bent. The paper on which it was printed had black fibers as if it was recycled paper. I considered it a good find. Now as I sat there with my drip coffee, I flipped to the section on ingredients. I still hadn't brewed. I had placed orders with many online homebrew suppliers, and I was either waiting for my brewing equipment to arrive or the equipment was in the middle of being assembled. Here I was not even a brewer yet and delving into Charlie Papazian's list of ingredients. I wondered as I read through each one what the strangest ingredient could be. Was it Ginger? Was it Coffee, or maybe hot peppers? As I read I imaged what each flavoring would be like and I kept wondering if I could ever brew so many different batches that I tried all of the ingredients that he listed. As I approached the last page of the ingredients section I came across the Cock Ale. I don't want to ruin this one for you, because Charlie is a much better writer than myself, but I will say that it refers to a rooster and that it does appear that it has been used before to flavor a homebrew. You can even try it you're self because there is a detailed recipe on how to make your very own Cock Ale in his book.
   As I sat there with my coffee getting cold and with Jen getting bored a huge grin spread across my face. I read the section out loud and immediately Jen and I had something to discuss and laugh about while we were hanging out in Portland that day. I had found a book that would guide me through the detailed technicalities of pitching yeast and all grain mashing, but more importantly I had found a book that was fun to read.
   Now 6 batches of beer later, I feel like a whole new world has opened up to me. "Microbrewed Adventures" is a great way to spend the overcast days in Seattle. There as so many ideas that come to mind while reading this book, and a little bit of inspiration comes through in Charlie's words and stories to get me motivated. I wont recap on the entire book, but I do really like one of his stories. During the Great American Beer Festival, as Charlie was handing out an award to Rogue Ales' John Meier. John said to him, "That's your recipe taken right out of your book." (Story taken from "Microbrewed Adventures")
   So rememeber if you want to win a brewing award know what the judges like, and if your judge happens to be Charlie Papazian, then you can't go wrong with one of his own recipes. Happy Brewing Everyone, and Happy Holidays.