
I got it! To save money I purchased the STC-1000 aquarium digital mini temperature controller from a place in Hong Kong. $25 paid for the controller including temperature probe and shipping. That's too good to pass up considering I would have to pay about $80 for the equivalent one here in the states, and you'd have to buy the temperature probe separately. I also didn't want to pay a lot for something that I may or may not have gotten to work. It took about a month to receive the package due to extremely bad weather, however that is exactly why I needed it. I'm using it in conjunction with a Ferm-Wrap heat pad so that I can heat my fermenter with out leaving the house heat on. You can save money on the Ferm-Wrap too if you buy it online. The Ferm Wrap Heating pads are the same pads used to keep retile cages warm.

In this photo you can see the heating pad covering the outside of the fermenter.
You can buy different sizes of FlexWatt Tape so you can customize it to your fermenters. I needed one with less width and more length to fit my conical fermenter.
It's also distributes heat better so that you can use it on glass carboys. It's a better alternative to the heat belt which could break glass carboys. The FermWrap can also be insulated on one side, so you can still wrap a towel around your fermenter after you get it all set up.
If you want to use your temperature controller as a refrigerator controller. It works for that as well. It has dual functionality so you can use it to control a heater and a refrigerator at the same time. When the temperature drops below set value it turns on power to the heater, and when the temperature gets above set value it turns on power to the refrigerator.
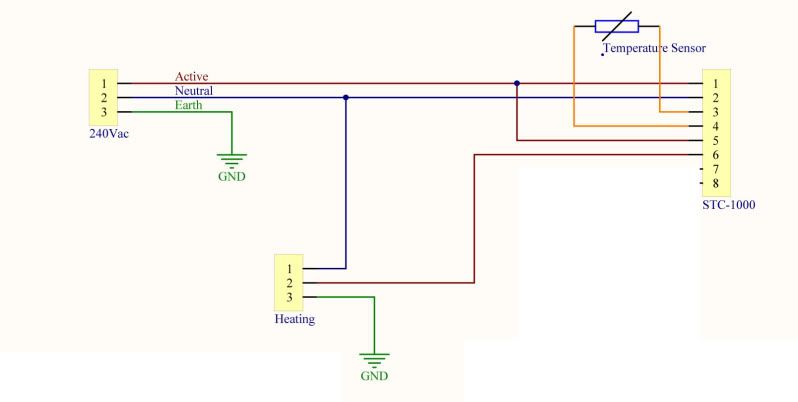
So I got the STC-1000 and after a little trial and error I was able to get it wired up. I used this diagram DIAGRAM LINK and it worked for me. As usual when I first got it, I tried to wire it up with out using the diagram and just wasted about 30min. After that, I looked at the diagrams and wired it up correctly. It uses a direct negative to the heater with a controlled on/off switch for the positive power. It's very basic. The digital display is in Celsius, which is weird considering I like the Fahrenheit scale better for brewing. Fahrenheit is a large enough range that you don't have to mess with decimals. Also I have all of the land mark values memorized in Fahrenheit. I really don't know how much more memorization my brain can handle, but I suppose a few Celsius values wont overload it. I recommend this temp controller for anyone new who hasn't used these devices before. They're a good unit to learn on.
However I have not used the other types of temperature controllers, so a direct comparison from me is not available.
I'm in between ferments right now so I don't have the FermWrap on however, here are some pics. I will show a pick of it with the FermWrap as soon as I can. In the mean time check it out.


I just wired up a second unit. The cost for a unit is $25 for the digital temperature controller with temp probe
Controller with Probe $25
Extention cord $2
Plug for Heat Pad $9
Heat Pad Tape $9
Total $45
That's really not bad. Less than the price of a glass carboy and almost as essential. I can honestly say that temperature control over the ferment is very important to obtaining a good tasting beer.
I normally set the temperature to whatever the optimal value is for the yeast I'm using then cover the whole thing in a sleeping bag. In the summer I keep the fermenter in the coolest place I can find while it's fermenting, however during the winter I just keep the Ferm Wrap with temp control hooked up and keep it really well bundled with old sleeping bags. It works real well. I get consistent temperature which keeps the yeast happy. When the yeast is happy, the beer is happy.
This is the first DIY temp control set up I have seen that is under $300-$400. I'm brewing in my garage in Los Angeles, and I'm planning on following your instructions for building my fermenter, but I need to figure out cooling since my garage will be 80-90 degrees in Summer. Have you installed a cooling system on any of yours? I'd love to see some designs.
ReplyDeleteGreat stuff,
Chad
I'm glad you came to read about my brewing adventures. It's been a while since I've posted anything, but I'm still actively fermenting and brewing things. I just finished a Crisp Apple Cider, but that's something else entirely. The Temp controller if you've already received yours acts like a sophisticated switch. So it's important that you how the wiring works before you use it, however once you're an expert on it you'll be able to use it to control 2 devices. The low temp will turn on a device such as a heater, and the high temp can be used with a device such as a refrigerator. I never had a use for the refrigerator portion since I always brewed in the fall and winter, Even during the warmer months in Seattle, it never got much about 85 and even then it was only for a few weeks. I just waited it out. However I did have a friend who was using my STC-1000 at that time and we did rig it up to control a fridge that he used for making a lager. I wish I had some picks but the idea is simple get your STC-1000 set up with cold instead of hot. I hope this helps. I wish you a great brew adventure. Good Luck
DeleteTravis
To save money I purchased the STC-1000 aquarium digital mini temperature controller from a place in Hong Kong. $25 paid for the controller ... temperaturecont.blogspot.com
ReplyDeleteThis comment has been removed by the author.
ReplyDeleteStay warm and cozy this winter with the latest range of buy room heaters online in india available online at unbeatable prices. Choose from a wide selection of fan heaters, oil-filled radiators, halogen heaters, and quartz heaters, designed for maximum comfort and energy efficiency. Whether you need a compact heater for your bedroom or a powerful one for larger spaces, you’ll find the perfect model to suit your needs and budget. Enjoy easy online shopping, doorstep delivery, and expert customer support. Call now: 1800-212-9001 to get exclusive deals and expert assistance in choosing the best room heater for your home!
ReplyDeleteBeat the freezing Delhi winter with the Best room heater for Delhi winter, designed for fast, efficient, and safe heating. Wallex room heaters deliver powerful warmth while being energy-efficient and easy to use—perfect for homes and offices during cold days and nights. With advanced safety features, stylish design, and reliable performance, Wallex ensures maximum comfort all winter long.
ReplyDeleteCall 1800-212-9001 to buy the best Wallex room heater for Delhi winters and enjoy quick delivery, affordable prices, and cozy warmth every day.
Learn how to clean your kitchen exhaust fan the right way to keep your kitchen smoke-free, hygienic, and safe. Proper exhaust fan cleaning removes grease, dust, and odors, improves airflow, and reduces fire risks. Follow the correct steps and maintenance tips for efficient performance, or call 1800-212-9001 for professional kitchen exhaust fan cleaning services you can trust.
ReplyDeleteBuy ceiling fans online and enjoy up to 30% off on top-quality, energy-efficient fans for your home or office. Explore a wide range of stylish ceiling fans with powerful airflow, low noise, and durable performance. Get the best deals, easy online ordering, and expert assistance—call 1800-212-9001 today for exclusive offers and hassle-free purchase.
ReplyDeleteBuy the Wallex heater power consumption and enjoy efficient, cost-effective warmth without high electricity bills. Designed for fast heating and safe everyday use, this heater delivers powerful performance while consuming minimal energy. Ideal for homes and offices, Wallex heaters combine durability, modern design, and reliable safety features. For quick assistance or to place your order, call 1800-212-9001 and stay warm this winter with smart heating solutions.
ReplyDeleteStay warm this winter with our low-priced heaters designed to provide efficient heating without burning a hole in your pocket. Ideal for homes and offices, these heaters offer quick warmth, energy efficiency, and safe operation. Enjoy reliable performance, compact designs, and budget-friendly prices that suit every need.
ReplyDeleteFor the best deals and expert assistance, call 18002129001 today and make your winter cozy and comfortable.